IMM 5257 Schedule 1
This is the Travel History Form, in the IEC world often referred to as the “pain-in-the-ass form.” It’s a common source of frustration because it’s only requested after you’ve submitted your biometrics and a human officer starts reviewing your application. Just when you think you’re almost done, this form is requested, causing unexpected delays.
Why does it happen? Because there’s a gap in your work history or resume, even a small one. The processing officer notices these inconsistencies, and instead of approving your application, they ask for this additional form.
This form is completely preventable if you fill out the work history section and resume
- without ANY gaps
- back to your 18th birthday
If you followed the exact Working Holiday application steps and tips > here < you will be spared from this particular form.
If the form is requested from you, there is no way out:
The requested form in the letter will be: IMM5257 – Schedule 1 – Section 8
The letter also:
- states a period of time that you have to fill out,
- provides a link to download the form,
- provides a deadline by which you have to submit the document.
Important rules about the IMM 5257 SCH1 form:
(And why applicants call it the “pain-in-the-ass” form)
- The form must be the most recent form.
- The link to download will be provided in the letter.
- Don’t try to search old forms to download from third party sites.
- It must be downloaded via the link in the letter or from the official canada.ca homepage.
- The form cannot be printed out and filled out by hand.
- You have to fill it out directly on a computer and validate it with “Validate“.
- To be able to validate the form, all questions from 1-8 must be answered.
- The form cannot be filled out on a mobile phone or iPad. Only on a PC or laptop.
- If you’re travelling and don’t have access to a computer or laptop, you’ll need to find one (for example in a library).
- The form
- cannot be combined with other PDFs into a document.
- cannot be uploaded by printing it and scanning it.
- does not need signing.
- You cannot rename the form when saving it. You must keep the same file name.
- Save the form with the same name in another location than where it was downloaded.
- Then upload from there.
How to fill out the IMM 5257 SCH1 form:

⚠️ Ignore the wording in section 8 of the form:
You must fill out the exact time frame requested in the letter you received. Without any gaps and including the home stays.
- First, list everything on a piece of paper and make sure the timeline is complete with no gaps for the requested time frame.
- Then transfer the information to the form.
- For section 8 of the form, start with the year/month and end with the year/month specified in the letter.
- Only your travel history is required, you must list all countries you have travelled to.
- Purpose of travel is usually “visiting”
For this specific form, any trip regardless of the duration, must be listed. Especially the entries where you used a passport are cross-checked with official records, so it’s important your travel history matches what’s in the governments systems.
Example of how the rows under “from to” should look if you have only traveled once:
- Period at home
- Period of the trip
- Period at home
If you only travelled a few days during the same month:
You can list the same month and for the purpose of travel, simply enter “xx days/weeks vacation.”
Below is an example of a travel history between 2023/02 – 2025/06 for a UK participant
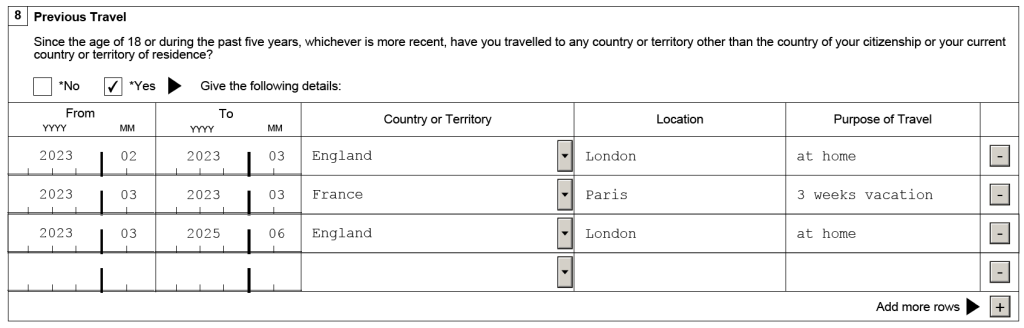
I travelled visiting multiple countries and cities. How should this be entered?
- If you travelled within a single country and visited multiple cities, make one entry and enter the city where you first arrived.
- If you also travelled to other countries, create a separate entry for each additional country.
If the rows in the form are not enough, here's what you can do
If you’ve had multiple trips and run out of space, don’t worry. You can add more rows by clicking the “+” button at the bottom right corner of the section 8. You can insert up to 30 additional rows, which should be enough to include your full travel history.
If your trips were so many that even with “Add more rows” there are not enough rows, you will need to submit the extra information on a separate form via the IRCC web form.
Steps to proceed:
- Complete the form (which we call form 1).
- In the last row, add a note under “Purpose of Travel” stating: “see more rows via webform.”
- Upload form 1 to your GCKey account and submit it (after submission it must be on “replacement provided”).
- Complete another form (which is now form 2):
- In the first row, write: “continued from first form.”
- Fill in the remaining travel entries.
- Merge form 1 and form 2 into a single PDF.
- Submit the merged PDF using the designated webform >> here
- Select “International Experience Canada” from the drop-down in the web form, fill in all the necessary input fields and upload the document in the next step.
If you did not leave a gap and received the request anyway
When you submitted a copy of your passport in the application you had to include all pages with stamps or entry/exit records. IRCC may be reviewing your travel history and want to confirm how long you stayed in a particular country.
Did you know that five countries share immigration data through the Five Eyes Alliance?
These countries are Australia, Canada, New Zealand, the United Kingdom, and the United States. These countries can immediately see where you travelled and how long you stayed.
For travel to other countries, IRCC can request access to your travel history as well.
Every time you check in for a flight or enter a country, your passport is scanned. Even if there is no physical stamp, digital immigration records still exist for both entry and exit.
If you did not travel at all during the period that is requested:
Which means, in the requested time frame you were at home.
- You still have to answer “Yes” to question 8, otherwise the rows will not open up.
- List the entire period requested in the letter
- Under “country” you enter your home country and under “location” your hometown
- Unter “purpose of travel” you enter: “Not travelling, in my home country”
I can't remember the trips for some dates
If you can’t remember the exact dates or destinations of your past trips, do your best to find them.
- Social Media: Look through old Facebook or Instagram posts, WhatsApp conversations with friends or family
- Email account: Search email using keywords like “flight confirmation,” “reservation,” “hotel,” or airline/hotel names.
- Credit card or bank statements can also help find travel-related expenses like flights, hotels, or restaurants.
- Ask travel buddies, friends or cousins you traveled with, they might have kept better records.
- Ask your parents or close family members. You might be surprised by how much they remember about your travels, sometimes even more than you do!
Other places to look:
- Cloud photo backups (like Google Photos, iCloud, or OneDrive): These often organize pictures by date and location.
- Travel and booking apps: Airbnb, Booking.com, or Expedia may have a history of your bookings if you used them.
When you're done with the form: You must submit it!

- Save it to your PC.
- Upload it into the provided spot in the document list in the GCKey account.
- Very important! You have to go through all the steps in the account again with “Next” until the end until the status of the document is set to “Replacement Provided“.
Here is how you can find the upload spot and upload it
- Sign in to your account.
- Look for your application under View the applications you submitted.
- Under the Action column, click Check full application status.
- At the top of the page, click View submitted application or upload documents.
- Scroll down the page and click Continue.
- Under Documents submitted by the client, you can find
- Document Name: the document we need
- Instructions: more information on the type of document and how to get it
- Required by: the latest date by when we need to receive the document
- Click Upload file and follow the steps to upload your document to your account.
- If you need to submit more than 1 document, read what to do if you have multiple documents before uploading any documents.
- Make sure that your documents are under the file size limit for the online application you’re using.
- Make sure the Details column shows the message Uploaded – not submitted to IRCC.
- Click Next.
- Provide your Signature by entering your Given name(s) and Last name(s).
- Answer the Security Question.
- Click Sign.
- Click Transmit.
- The following message should appear on your screen: “Congratulations! You have successfully submitted your application or profile. You have successfully transmitted your additional or replacement document(s).”
- After you see the message, you’ll receive an email confirming you’ve added a new document.